Beth Alvarez - Author of Epic Fantasy
  • Older and wiser

    So yesterday was my birthday.
    I normally write stuff to post ahead of time, but this time, I didn’t. I thought I’d have some kind of deep, introspective musing to write about after the celebration. But it didn’t happen. And there wasn’t that much celebration, either.

    I had a wonderful afternoon with some spectacular friends, we had bubble tea and lunch and then my mother and I went shopping. My husband came home from work and made flautas for dinner, my favorite Mexican dish. We baked a cake, I wrote a little, and we went to bed without touching the birthday cake.

    28 isn’t a very exciting birthday. Either that or as you grow older, birthdays just mean less. I watched an eager two-year-old open all my presents and squeal over the Hello Kitty wrapping paper. I thought about how being 28 doesn’t feel much different from being 27. Or 25. Or 19. Once you’re grown up, another year doesn’t change much. And I’m still in the blessed renaissance of years where they don’t add wrinkles or gray hair, either. It’s just another number, that’s all.

    But a year can add a lot to life, even if it changes little. In my 27th year I undertook a lot of big projects to move forward with writing. I helped edit several books. I sent out query letters and got my first batch of rejections. I learned how to season a cast iron skillet and I improved a lot of my artistic skills. I picked up new hobbies. I wrote a large part of a book.

    It wasn’t an exciting year, but it was a happy one. And I still have two years ahead of me before I’m what my dramatic younger self considered “halfway to old.” I don’t know that those two years will change a lot, but I hope they bring a lot of new knowledge. Oh, and toys.
    It’s normal to get toys from your parents for your 28th birthday, right?

  • Sewing a dress shirt for Iplehouse EID, part two

    If you missed the first part of this tutorial, you can find it over here.
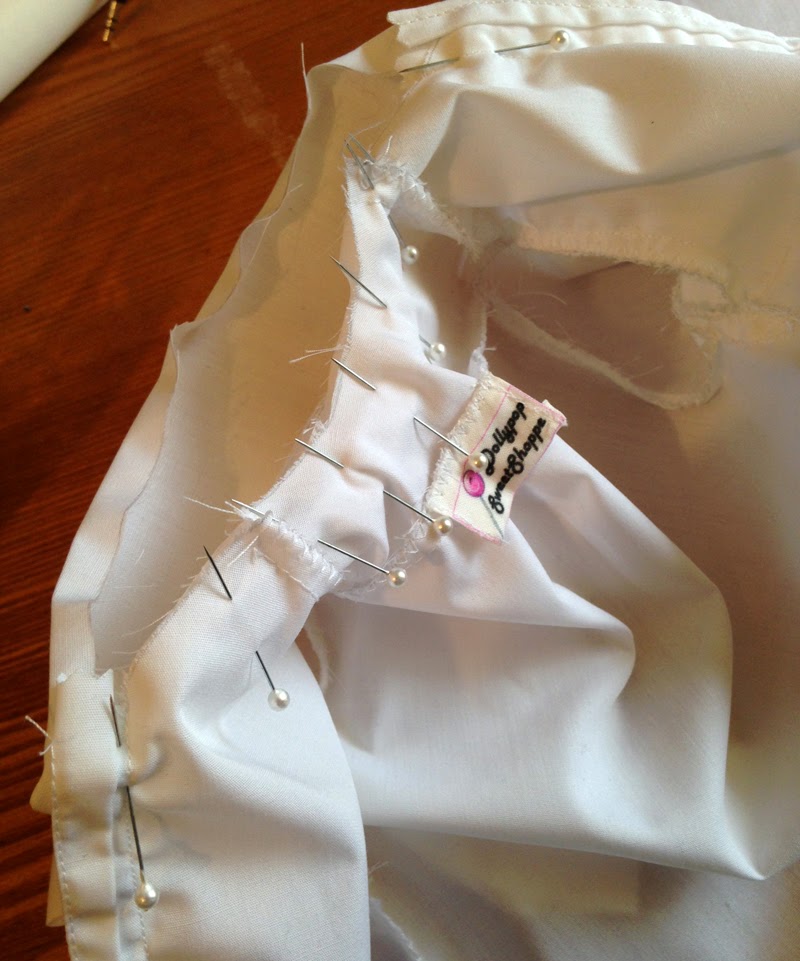
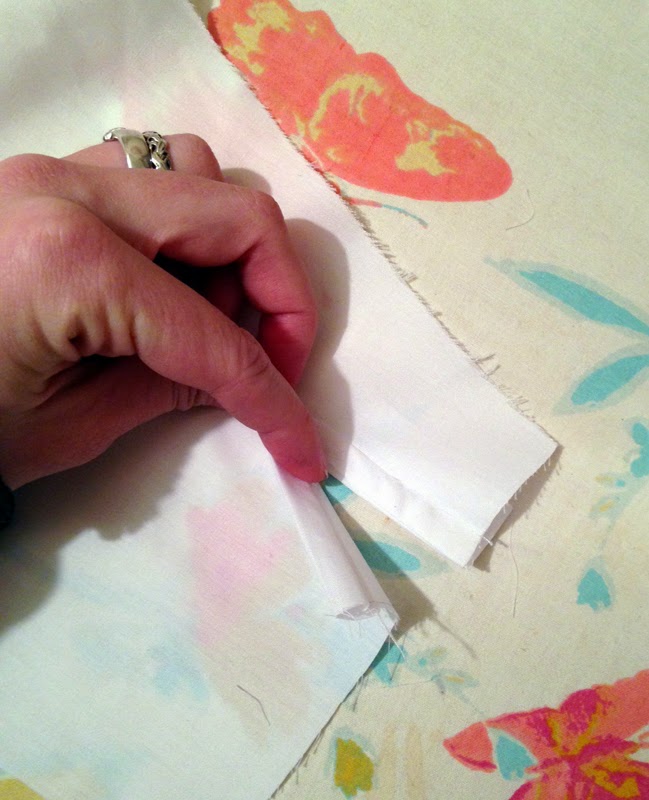
    As promised, I took another picture of the finished sleeve lap to show how it is constructed. Though mine differs from the pattern, the construction is the same.

    Now that that’s out of the way, I hope you’re ready for the hard parts. Picking up where we left off…

    Step Ten
    Pin up the sides of the shirt and sleeve and stitch each side closed with one seam, from sleeve end to bottom of shirt. Finish with a zig-zag edge.

    Step Eleven
    Turn the bottom edge of the shirt up 1/4th of an inch and press in place.

    Roll it another 1/4″, pin it and sew to create the bottom hem. Then get ready, because next comes the difficult stuff.

    Step Twelve
    Run a zig-zag stitch down one side of each of the two cuff pieces. Then take them to the ironing board, fold the short sides in 1/4″ and press.

    Putting the cuff to the inside of the sleeve so right sides of the fabric are together, pin the raw edge of the cuff to the edge of the sleeve end, making sure the folded end of the cuff reaches the end of the lap plackets. The sleeve will be larger than the cuff at this point, so pin the ends and leave the middle loose. Begin placing pins to anchor the sleeve to the cuff from the lap, moving toward the bottom of the sleeve where the seam is located. It is important to move this direction.

    Use a ruler or sewing gauge to place a pin one and a half inches from the seam in the bottom of the sleeve on the side of the sleeve opposite the lap.

    Gather the extra fabric on the other side of this pin, where the sleeve is still loose and does not fit to the cuff, and fold it over the pin to create a pleat. Then pin the pleat in place.

    Sewing slowly, sew the cuff to the sleeve. I know it’s tempting, but DO NOT sew over the top of the pins with a sewing machine. It’s an excellent way to break pins, needles, or your entire sewing machine. Once sewn, unfold the cuff from the inside of the sleeve.

    Step Thirteen
    Fold the cuff in half, putting the zig-zagged edge to the inside of the sleeve. Make sure it overlaps the seam where the cuff was attached.

    From the right side of the sleeve/cuff, stitch the folded cuff to replicate top stitching. Turn the cuff at each corner to stitch along all four edges.

    Step Fourteen
    Pin the two pieces of the collar together. Sew the sides and top, leaving the bottom edge open.

    Clip the top corners at an angle to remove bulk.

    Turn collar right side out and press. While at the ironing board, turn the bottom edge of the collar  1/4″ to the inside and press.


    Step Fifteen
    Unfold the bottom edge of the collar and pin one side of it to the back of the shirt.

    From the collar side, sew the collar to the shirt, leaving the collar open.
    Once stitched, flip the collar upright and pin it into place, covering the raw edge as shown.

     Sew it down and add top stitching to the edges of the collar.

    Step Sixteen
    Zig-zag all the way around the edges of the pocket piece, then fold the edges over by 1/4″ and press.

    Sew the top edge of the pocket down.

    Pin the pocket to the front of the shirt and sew the sides and bottom, leaving the top open to make it a functional pocket.

    Step Seventeen
    The finishing touches! Add buttons or snaps to the front of the shirt and the cuffs.
    Then sit back and pat yourself on the back, because the shirt is done!

    Although it was my first pattern, it’s not a great one for beginners, so if you’ve made it this far, you’ve done great. If you think it’s beyond your skill, though, don’t feel bad! Sewing is a challenge, especially in doll scale.

    For everyone who isn’t comfortable holding a needle and thread, have a look at The Dollypop Sweet Shoppe on Etsy, where I keep dolly dress shirts stocked in both EID and SID sizes.
    Happy crafting!

  • Sewing a dress shirt for Iplehouse EID, part one (Pattern included)

    Before we even begin, I have to apologize for 3 things.

    1. This was the first pattern I ever made. I had no idea what I was doing, I just really wanted one of my dolls to have a dress shirt. It isn’t perfect and could probably stand to be updated and improved. That said, if you follow the pattern and instructions, it WILL turn out okay. I just made a few things unnecessarily complicated when I drew the pattern. For that, I am sorry.

    2. I am not following the pattern exactly in this tutorial. One thing is different: I changed the shape of my sleeve lap because I wanted to try making the top lap larger so I could do decorative stitching on it later. If you want to follow the pattern exactly, the steps will be the same – the lap will just be smaller than what is in these photos.  If you want to follow the tutorial exactly, that’s easy! When you cut the pieces for the sleeve lap, just cut 2 in the size of the pattern and cut 2 that are roughly twice as wide as the pattern piece and about an inch longer. It doesn’t need to be perfect, you’ll be trimming the excess away anyway.

    3. The pictures are awful. They’re enough to give you a rough visual of what’s going on, but we’re going to have to rely heavily on words. My craft room is really dark and while I started in the afternoon, I had to stop and didn’t come back to it until the sun was setting. Without natural daylight, it’s really, really dark in there, and my pictures are taken with my cell phone, since the DSLR is too big for me to wrangle one-handed. I have dainty lady hands, not cut out for that kind of muscle work.

    With those things in mind, I hope this is still helpful. Though it was drafted for my EID Super Hero, it should also fit the Model body, though you may wish to add a little more length to the body and sleeves to accommodate the Model body type being slightly taller.

    Things you will need:
    This pattern, made from scratch by me – FOR PERSONAL USE ONLY, thank you! Please do not redistribute this pattern. Alteration does not make it okay to redistribute, either. If you see anyone redistributing this pattern or a derivative of it, or trying to sell my pattern or doll clothing made from it, please notify me.
    – A printer and paper
    – Fabric
    – Scissors
    – Thread
    – Pins
    – Hand needles
    – Buttons or snaps
    – An iron and ironing board

    Things that will make your life easier:
    – Pinking shears
    – A sewing machine

    Step One
    Prepare your pattern and fabric. The pattern pieces will fit on a sheet of normal A4 printer paper, but it’s a tight fit – Turn off printing margins for the page and print at 300 DPI. The pattern includes a 1/4″ seam allowance, which is typically the distance between a machine needle at center position and the outer edge of the machine’s standard foot, though this can vary between machines.
    If you use traditional shirting fabric or any type of satin, you may wish to use pinking shears to prevent fraying.

    Step Two
    Beginning with the back of the dress shirt, pleat the middle (to the front or to the back is your preference, though traditional dress shirts have the pleat on the outside) so the yoke pins to the top edge of the pleated back, with the pleat in the center.

    With traditional assembly, this means the raised side of the pleat will be between fabric layers. You will likely want to use extra pins to make sure it stays in place.

    Once pinned, stitch the yoke to the shirt back. After the seam has been sewn, switch to a wide zig-zag stitch and go back over the edge to prevent fraying. When unfolded, the back of the shirt should look like this:

    Using your iron, press the pleat and seam. If you are not familiar with sewing terms, please note the difference between IRONING and PRESSING – Pressing is merely putting the iron flat against something to make it lay down. Ironing is moving the iron around on the fabric, like you would to remove wrinkles. We will not be ironing, only pressing. Ironing can cause un-sewn fabrics to distort or change shape, and generally only finished garments or uncut fabrics should be ironed!

    Step Three
    Placing right sides of fabric together, pin the shirt front to the yoke at the shoulder seam.

    Sew both shoulder seams. Finish with a zig-zag stitch and press.

    Step Four
    Pin the button placket strips FACE DOWN on the WRONG SIDE of the shirt front. If you are using plain fabric, the direction matters less, but if you are using patterned fabric, be SURE you see the wrong side of both pieces of fabric or your placket will turn out wrong.

    The placket strips are longer than the front of the shirt to make them easier to line up, so it doesn’t have to be perfect. You will trim off the excess later.
    Sew the plackets to the shirt fronts. Do not finish edge, but fold placket out and press flat. After pressing, the right side of your shirt should look like this:

    Step Five
    Fold up one quarter inch of fabric on the edge of the placket strip and press flat. It should now look like this on the right side of the shirt:

    Step Six
    Fold the placket over onto the right side of the shirt so that raw edges are covered. The raw edge of where the placket meets the shirt body makes a great ruler – You should fold the placket so that the existing seam line is covered.
    Once it’s folded over, I move the needle to the leftmost position to make it easier to get close to the edge, but if you go slow, you can achieve the same effect without moving the needle. Stitch the folded edge of the placket onto the body of the shirt front…

    …then top stitch the other edge of the placket for a neat finish.

    The right side of your shirt should now look like this:

    Step Seven
    Laying the sleeves across the shirt with right sides of the fabric together, pin the shirt sleeves to the arm hole. If you have already cut the slit for the sleeve lap, make sure the lap is on the side to the back of the shirt.

    Stitch slowly, following the curve. Finish the edge with a zig-zag stitch.

    Step Eight
    If you have not yet cut the slit marked for the sleeve lap, cut it now. The strips for the lap should be slightly longer than the slit cut. My scissors slipped and mine was too long. Oh well, not the end of the world.

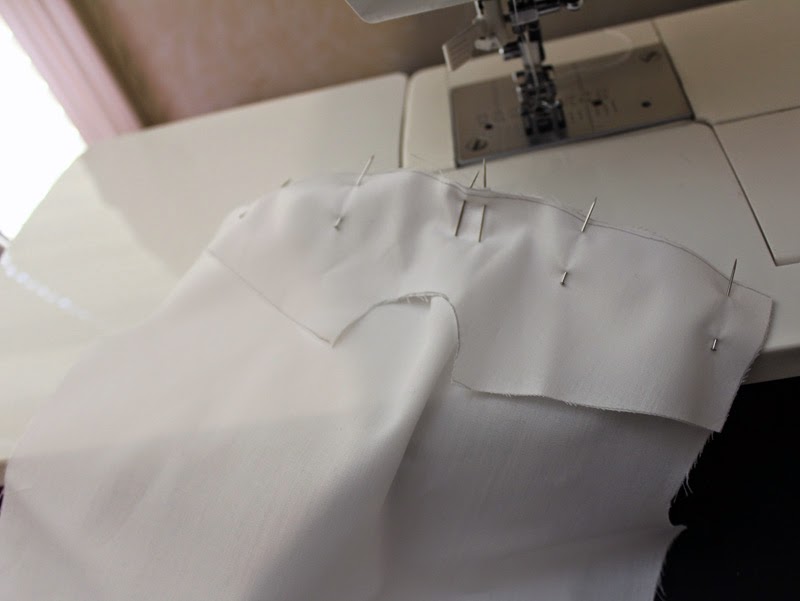
    Folding the lap strip in half , pin it to the right side of the sleeve with the folded edge at the top of the slit. If you are making a larger decorative lap like I am in these photos, put the larger lap piece on the larger side of the sleeve, and the narrower lap piece on the smaller side.

    Stitch from bottom edge to the top of the slit. Turn and sew across to the other lap, then sew down to the edge. Repeat on other sleeve.


    Step Nine
    Using your scissors, nip a small angled cut into the corners of the lap to give the flaps room to move. If you are using pinking shears, pink the outer edge of the sleeve laps now. Otherwise, you may wish to use a zig-zag to prevent fraying.
    This step was very difficult to photograph since I needed both hands to hold the fabric and iron. Fold the lower lap (The small side) to the wrong side, covering the raw edge. Press.
    Fold the edge of the upper lap 1/4″ and press flat. Then fold the upper lap over and press flat so it covers the lower lap entirely.

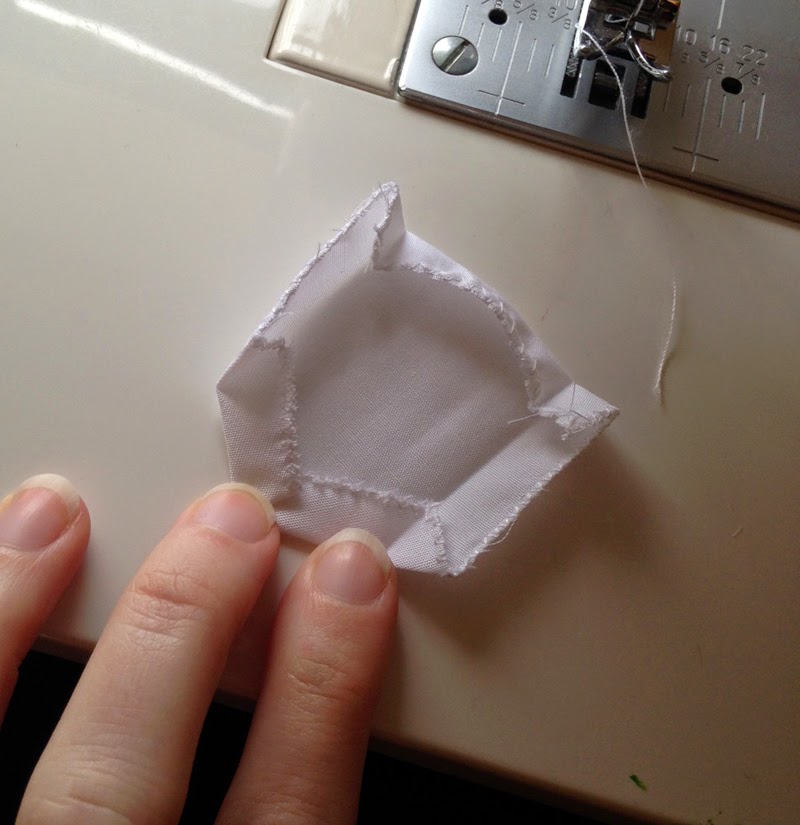
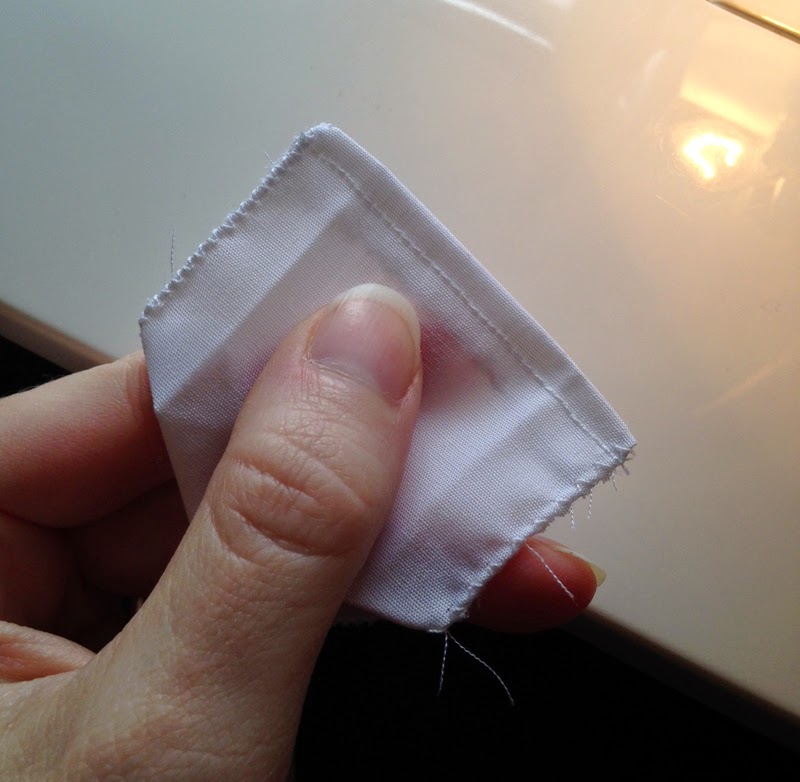
    This picture is horrid, but it shows the lower lap folded under and the upper flap folded to lay above it. My thumb and middle finger hold the top of the upper lap, where you will stitch across to hold the laps down.
    If using the larger top lap like I am in the photos, make sure the raw top edge is folded under, then sew a line straight across the top of the slit to hold both laps in place.

    Ready for part two? Here it is!

  • Goals for the New Year

    I’m not a big fan of resolutions, but I like goals. Goals are really compatible with lists, and I think we’ve been over how much I like lists before, right?
    There’s a lot of reasons not to like resolutions, but since statistics indicate making something a resolution makes it less likely to happen, it’s not a great start to your year. And besides, if you’re going to make a big life change, why wait until the new year? You can start that at the beginning of a new month. Or a new week. A new day. A new hour. No reason to wait. Resolutions can happen any time, they aren’t limited to the new year.

    The great thing about setting goals instead of resolutions is that it’s easier to make small adjustments to your goals as you figure out what you really want. It’s also easier to break down into small tasks, which are easier to complete. There’s a lot of things I want to do in 2015, but here’s just a few I’ve thought about enough to fit them into words… and put them on a list.

    Finish writing my current work-in-progress.
    It’s all downhill from here, wrapping up the last quarter of the book, but I’m hoping that if I press really hard, I can get it finished by the end of January.

    Send out queries for my last completed project.
    I was going to do this through November and December, but so many agents take time off in those months that I decided I’d wait until the new year to get things rolling. I’m hoping, of course, that seeking representation will result in getting it by the end of the year, but we’ll see what happens!

    Make progress with organizing the house.
    Simplifying is a big part of this, and Christmas probably means a big influx of stuff to contend with. By the end of January, I hope to have everything from Christmas (decorations included!) under control. By mid-summer, I hope to have the whole house settled. But if it takes longer than that, that’s okay.

    Finish the big to-do list.
    Yeah, that’s right. A to-do list is on my to-do list. Only me, right? Back in November, I made a big list of all the projects I’ve started, but haven’t had time to finish. As I type this, there are 29 things left on the list that are unfinished. That sounds pretty bad, but in November alone I completed 18 things that were on the list. Some projects shouldn’t take more than a few hours, though some may take a few days. By this time next year, I hope to have them all done. Should be possible, right?

    I’m sure there are other things I’ll want to do or discover as I move into the year, but for now, those are the big goals on my mind.
    What are your plans for 2015?

  • Hard work

    “But you don’t work.”
    It’s a common insinuation that stay-at-home mothers have to fight–the idea that because they’re home all day, they don’t work. Every day, I see countless posts on social media sites sharing articles written by exhausted and exasperated mothers explaining just how hard they work. I get it, and I’m right there with you! But this isn’t just about being a stay-at-home mom. There are tons of people who stay home all day instead of working conventional jobs, and let me tell you, it’s hard work.

    Writers and artists can all sympathize. Sometimes when you aren’t sitting at your desk, you’re working harder than ever. Sometimes you never stop working. Almost every moment of the day is filled with problem-solving and studying, planning and working through things in your head. You may only spend half an hour getting your hands dirty with putting pen to paper or paint to canvas, but you’ve been working, believe it.

    For me, I’m hit with a triple-whammy when people say it to me. “You don’t work” is a phrase that makes me stare in disbelief.  It’s right up there in the “I can’t believe you just said that” category along with another favorite, the dreaded “What do you do all day?”
    I work. I work harder than you realize. I keep house and tend a baby all day, while being a writer slogging my way through a second epic fantasy novel, and being a small business owner. I work almost every waking moment of the day, so when I hear those phrases, all I can do is gape.

    It’s difficult to have a profession where a great deal of your work is invisible. People don’t understand how much effort goes unseen, and they also don’t realize that creativity isn’t just difficult, it’s exhausting. It’s a never-ending shift at a job that often doesn’t pay. But at the same time, it’s incredibly rewarding to see your efforts come to fruition at the end of all your struggle.
    Believe me, it’s worth it.

  • When Christmas came early

    It’s been a long time since I’ve felt any sort of Christmas spirit, something I’ve chalked up to working in retail. Working at a craft supply store was worst, because it meant Christmas started at the end of June. But it’s been two years since I left my job, and this year, the first glimmer of Christmas spirit came back at the beginning of November.

    From decorating plans to preparing gifts, we started everything a little earlier this year. And because of my husband’s work schedule and the fact he’s to work Christmas Eve, we decided to take our holiday visit with my family a little sooner, too.

    I don’t think it could have worked out more beautifully. The Christmas magic was with us from the moment we got in the car. We packed the trunk full of coats and blankets and even some gifts. And once we got to the last hour of the drive, we were driving through light flurries. Once we reached my family’s home and had the car unloaded, flurries turned into the perfect Christmastime white winter coating.

    It was just magnificent. Fat white snowflakes, a good wet snow to stick to everything. My Mom being the Christmas fanatic she is, there were even garlands up on the kitchen cabinets and a small tree already in the corner of the living room.

    We watched the snow falling on the trees, still lit with brilliant mid-November colors. We watched neighbors wave as they drove by and watched everything turn blue outside as night fell. Deer played in the fields behind the house and we watched them through the afternoon and evening.

    Inside, we were laughing and relaxing, telling stories and dreaming about the future. Family played games and I taught my sisters to fold origami cranes. We ate a delicious home cooked meal together. We celebrated, just like it was Christmas.

    Back home, we’d already gotten gifts; new phones (free with contract renewal), new video games, and a stand mixer for me to use for my holiday baking. We spent the whole weekend feeling blessed and prosperous, and when we watched the sun rise into a blue sky on the day of our departure, it felt just like the morning after Christmas.

    As we headed home, we left behind all the snow, making it clear that even the snow was a special gift, just so we could really feel like we had the holidays together. Just like magic.

  • 200th Post Extravaganza!

    Okay, there’s really no extravaganza here, it just sounded like a really cool post title.

    So in case you couldn’t tell, this is the 200th post to my blog. Wow! 200 posts. It’s also been 3 years since I started blogging. That anniversary passed back in November, and I spent some time then looking at all the crazy stuff that’s happened since then. Since it’s pretty cool to look at, here’s a brief recap of the big things!

    Since I started this blog, I have…

    • Finished writing my first book
    • Self-published said book
    • Gotten a Mustang
    • (Re-)Started writing my second book
    • Had a baby
    • Quit my day job
    • Finished writing my second book
    • Started drinking tea
    • Started writing my third book

    And that’s sort of it for major keynotes, but that’s still an awful lot of change in three years. There have been tons of other, smaller happenings. Things like going to conventions, a brief stint as an assistant for a small publisher, and starting a few new business ventures. All of which are exciting, to be sure, but not necessarily life changing.  The businesses have the opportunity to become life changing, though, so there is that.

    So, um, there you have it. Hopefully the next 3 years will have just as many big exciting events happening.
    In the meantime, here’s a picture of a party hat I found on Google.

    Sorry about the no extravaganza thing.

  • Persimmon Tree Tea’s Sencha

     Ah, green tea. I’d really like to add green tea to every morning, both for the joy of drinking tea and for the health benefits green tea offers, but so far I haven’t found enough types of green tea I like to make me want to drink it every day. Today’s tea sample: Sencha, from Persimmon Tree Tea.

    Sencha is the green tea. The most popular drink in Japan. When people talk about green tea in the States, Sencha is what they mean. So what’s it like?
    Well… very basic.

    It has a pleasant ‘green’ flavor without tasting like it came out of my yard. It’s fresh and earthy, but not overpowering. It brews a lovely yellow cup of tea, which I find tastes better warm. But that’s about it.
    There’s nothing that makes sencha remarkable, and that might be why it’s so popular. But for me, the lack of anything different isn’t part of the appeal. It’s tea, straightforward, no nuances of flavor or surprises to be found.

    So while it’s enjoyable, this one finds a place on my “sometimes” shelf, while I keep searching for a solid daily drinker.

  • Whitewashing the fireplace

    My house is one big perpetual home improvement project. I’m easily distracted, so I have a ton of projects that I’ve started and never finished. The latest project I tackled? The fireplace.

    I don’t remember when exactly it happened. I just woke up one morning, walked into the living room, and said “I hate that fireplace.”

    And I did. It was big, dark and dirty-looking. I’d somehow never noticed how horrible the fireplace was, and I think my eyes were finally opened when we started preparing to paint the woodwork around it white. It really set off how much darker and smaller it made our living room feel. With only one small window, the room needed all the brightening it could get.

    So my mom came down to stay for a few days and help with the baby. And I got out some paint.
    I mixed leftover white latex paint with water in the only small bucket I had, dumping my sea shells and shark teeth all over the craft room table for the duration of the project. Then I taped off the metal doors and got started.

    It took several hours, but when it was finished, I was so excited I didn’t even wait for the paint on the top half to dry before putting stuff back on the mantel and taking a picture. As a result, the top half looks way darker in the “after” picture. It doesn’t look like that in person, I promise! Though I do intend to go back and touch things up when I get around to painting the rest of the woodwork around it.

    The end result is all our visitors being surprised at how much brighter the room seems, and everyone thinking I’ve repainted the whole room.
    Isn’t it funny what a difference a few hours can make?
    Now I just need to finish some of these household projects I start…

  • Clothes make the Marine

    I sit here basking in the knowledge I’ve finished the toughest sewing project I’ve ever undertaken. Let me tell you, it’s a good feeling!
    It started on a whim, which means I didn’t photograph the making of the pants. But if you’ve watched me on Facebook and Instagram, you’ve seen the stream of update photos taken with my cell phone. Going back over those photos was something else, so I decided to put them all in one post and talk about each step of the project. If you’re not interested in sewing or dolls, this probably won’t spark your fancy, but I had a great deal of fun with it.

    So how did I decide that one of my dolls needed a military uniform?
    I dunno, I just did. And if any of my characters were to be plunked into an Earth setting and end up in the military, it’d be Rune. I think there’s several alternate-universe stories floating around in my head where exactly that happened, actually… but I digress!
    I’ve always liked the snazzy dress blues Marines get, even before I got myself a Marine and got to fawn over him lookin’ stylin’ in his uniform at our wedding. So when I decided to make a uniform, it seemed like the best idea would be to make my favorite. And not just because I had the uniform on hand to reference! Still, it came in handy for matching colors and fabrics and drawing the patterns. Those things, of course, came first.

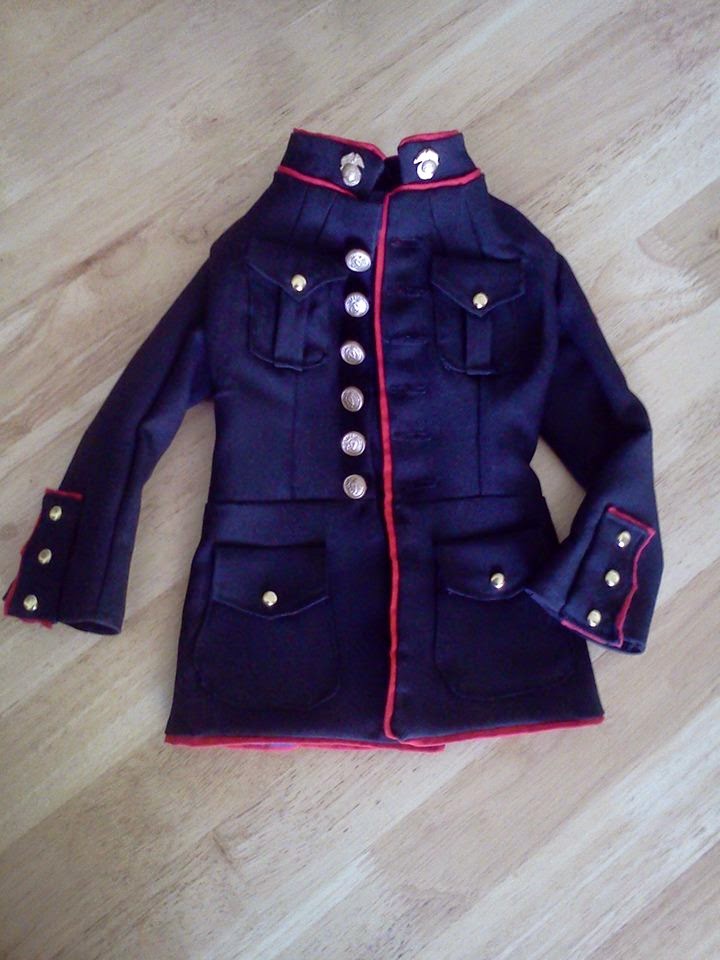
    I started the way I always do, taking a look at what I want to make and trying to draw a pattern. I had the benefit of studying Joe’s uniform, which meant all the seams ended up in perfect placement, something I’m ridiculously proud of. The pattern for the jacket also worked on the first try, which is pretty much amazing. And really fortunate for me, since I’m a lazy bum who didn’t make a muslin first to see if it would work. NOPE, I just went straight to chopping up the pricey fabric I picked.

    Since realism and accuracy was the goal, I used gabardine–the same stuff real dress blues are made of. I decided to line the jacket, too, though I didn’t line the sleeves to cut down on bulk and preserve mobility. Dolls are stiff enough as it is without super-thick sleeves.

    If you’ve never seen one of my dolls in person, here’s a great example of how big Rune is. He’s the biggest of my collection and I don’t think I could handle a doll any bigger than him. I’m sort of glad I got a huge doll as my first, because it makes the later ones just seem so manageable. I wouldn’t trade him for the world, but he’s definitely the upper limit of doll-ness I can take. At 70cm tall, he’s huge, and comparing him to my husband’s jacket really drives that home.

    Fortunately for me, the pretty flap on the sleeve covers an imaginary lap on the real dress blues, so it’s for decoration and nothing else. Thank goodness! It was hard enough getting a show flap to work, and after trying to trim it 3 or 4 times, I gave up and used felt instead of gabardine. The end result was good enough that I did the same thing for the shoulder straps. They weren’t perfect, but they turned out pretty well.

    The collar, however, was a nightmare. Despite pinking shears and a zigzag stitch to prevent it, the gabardine frayed so badly that I had to cut the collar edge WAY back to have anything to even sew to. It means the collar isn’t as close-fitting as I wanted, but it’s the best I could do. Getting the red edging in proved a nightmare, too. You see the pins on top? There’s just as many on the underneath, holding trim in place. But sewing very slowly helped it turn out okay in the end. Even if it’s not the exact fit I hoped for.

    Turning the jacket right side out for the first time was a moment of utter triumph. Every seam, every dart was as close to accurate as I could get, and once I ironed it after this shot, I couldn’t have been happier with how  it came together. The darts on the top are slightly closer together on one side than the other, despite how many times I pinned and basted and re-pinned and re-basted, but I decided to let it slide. All in all, that was a pretty minor flaw.

    After that, I had to start considering buttons and insignia. I spent weeks trying to find buttons online, and while you can apparently get miniature Army or Navy buttons anywhere, you couldn’t get miniature USMC buttons ANYWHERE. The solution to the problem was in our room, in the form of the teddy bear Joe gave me while he was in Okinawa. Though they weren’t in perfect scale, they were good enough.

    I used a 2-part mold putty left over from another project to cast copies. I used Sculpey first, but then switched to epoxy clay once I was pleased with the result. My gold acrylic paint, however, left a lot to be desired. I cleaned it off and tried again with gold enamel. I loved the color, but that caused me problems, too. The epoxy and enamel suffered a reaction due to the high humidity of this region, meaning the enamel never cured, staying sticky and gross. Ultimately, I just put a clear coat of acrylic over the top and called it a day. There was nothing else I could do. I can’t change the weather, after all.

    Putting in the pockets required a lot of pinning, basting and ironing. It also meant the first two pockets came out perfect, and the second two had to be removed four times before they matched.

    For smaller buttons, I had a heck of a time finding anything I could use. I ultimately chose scrapbooking brads in a bright, brassy gold finish. A little wiggling pushed them through the fabric without having to cut anything, meaning it’ll last better and I can change them out if I need to later. I added snaps under the brads on the pockets, so they’d still be able to function.

    After buttonholes were made, it was time to work on the patches. My great-grandmother was amazing at embroidery. According to my mom, Grandma tried to teach me, but I just sewed my embroidery to my pants. I’m glad these attempts went slightly better, even if they’re not perfect. Gold floss over felt made the patches, then a bit of fabric glue put them in place, one and one-thirds of an inch from the shoulder seam. That’s mathematically correct for the placement, you know.

    Gluing the pins to the collar was nerve-wracking and exciting at the same time. This pin turned out better than the other, for whatever reason. The other is lacking detail, but it’s still pretty, and much more accurate than if I’d tried to sculpt them both by myself. I wasn’t happy to have to use the same size casting on the belt and cover, but you work with what you got. The copies I cast from my husband’s uniform  for those two pieces were way too big.

    Putting everything together at the end was absolutely thrilling. The buttons took some experimentation. The first time I made shanks for the back, they popped right off as soon as I tried to sew the buttons on. I needed something bigger than just rings glued in place, so I took posts with pads for making post earrings and bent the post into a loop, then glued the pad to the back of the button to make a shank. The end result was perfect, and way sturdier than anything else I could have done.

    After the jacket was finished, it meant there were just a few little details left. One was making gloves, which proved to be a horrific experience in doll scale. Trying to manage all those little strips and bits and fingers is like trying to shove an octopus into a jar, and I had to redo my seams several times before they went together. In spite of all my careful measurements, the pinky finger ended up about a quarter of an inch too long. Turns out the EID dolls have weirdly disproportionate fingers.

    While I wanted to make replicas of my husband’s medals, I shopped for several months without finding something that was going to work, so I decided to just make the ribbons instead. I glued grosgrain ribbon to a strip of cardboard for a base, then used primary colors to mix all the paints I needed.

    Painting those hair-thin lines wasn’t fun, but it turned out pretty well in the end, even if the paint dried a little shiny. They aren’t perfect but they definitely give the right impression. Glued to a felt backing, the ribbons are easy to pin in place, so I can replace them with medals someday! The little star-pin (which represents having 2 of a ribbon, for those who don’t know) was harder to figure out. I ended up running a ball-headed pin for jewelry through the ribbon, painting some shadows on it and then smacking it with a hammer to make it lay flat. It ended up flattening in a downward direction (oops) but still looks pretty good for how small it is.

    The last two things to finish were the hat (SORRY, I meant cover) and the belt for the jacket. Both ended up being easier than I expected. The belt buckle was made with sheet aluminum I cut and filed and bent, then I glued the emblem on top and enameled the whole thing. A hook for a hook and eye closure was glued to the back, and the ribbon was glued on, too. The cover took a lot less time to make than I expected. I wanted to make it out of vinyl, but I couldn’t find any thin enough to use, so I used white gabardine, black vinyl and satin ribbon instead. To make it keep its shape, I put a disk and band of craft foam inside. They’re not sewn or glued in, just stuck in place, in case I ever need to wash or iron the cover.

    So how does it look all together?

    Pretty darn amazing. But I’ll post non-cell phone and non-Instagram pictures of the finished product after I get the doll’s head back from having some modifications done.
    Happy Thanksgiving, and a huge thank you to all the full-sized Marines and other service members out there!